Important Safeguardsssss
When using the X1 Chiller, always observe basic safety precautions, including the following:
Leakage Protection: Test the TEST button on the leakage switch before using the ice bath to ensure effective leakage protection.
Child Safety: Ensure children are supervised to prevent them from playing with the chiller.
Chiller Positioning: Avoid tilting the chiller more than 45 degrees to prevent compressor malfunction.
Air Inlet Protection: Do not cover the chiller's air inlet holes to avoid
compressor failure.
Placement: Maintain at least 70 cm distance from the wall to prevent hot air from re-entering the chiller. Do not place the chiller in a small enclosed space.
Power Safety: Do not unplug the chiller when the ozone signal is flashing on the screen.
Condensation: It is normal for condensate water to leak from the chiller when in heating mode.
Outdoor Use: Place the chiller indoors or under shelter if placed outside and protect it from freezing during winter weather.
Freezing Prevention: Drain the water inside the chiller if the ambient
temperature is below 0°C to prevent freezing and damage.
Operation: Turn off the chiller and unplug the power supply before taking a bath once it reaches the set temperature.
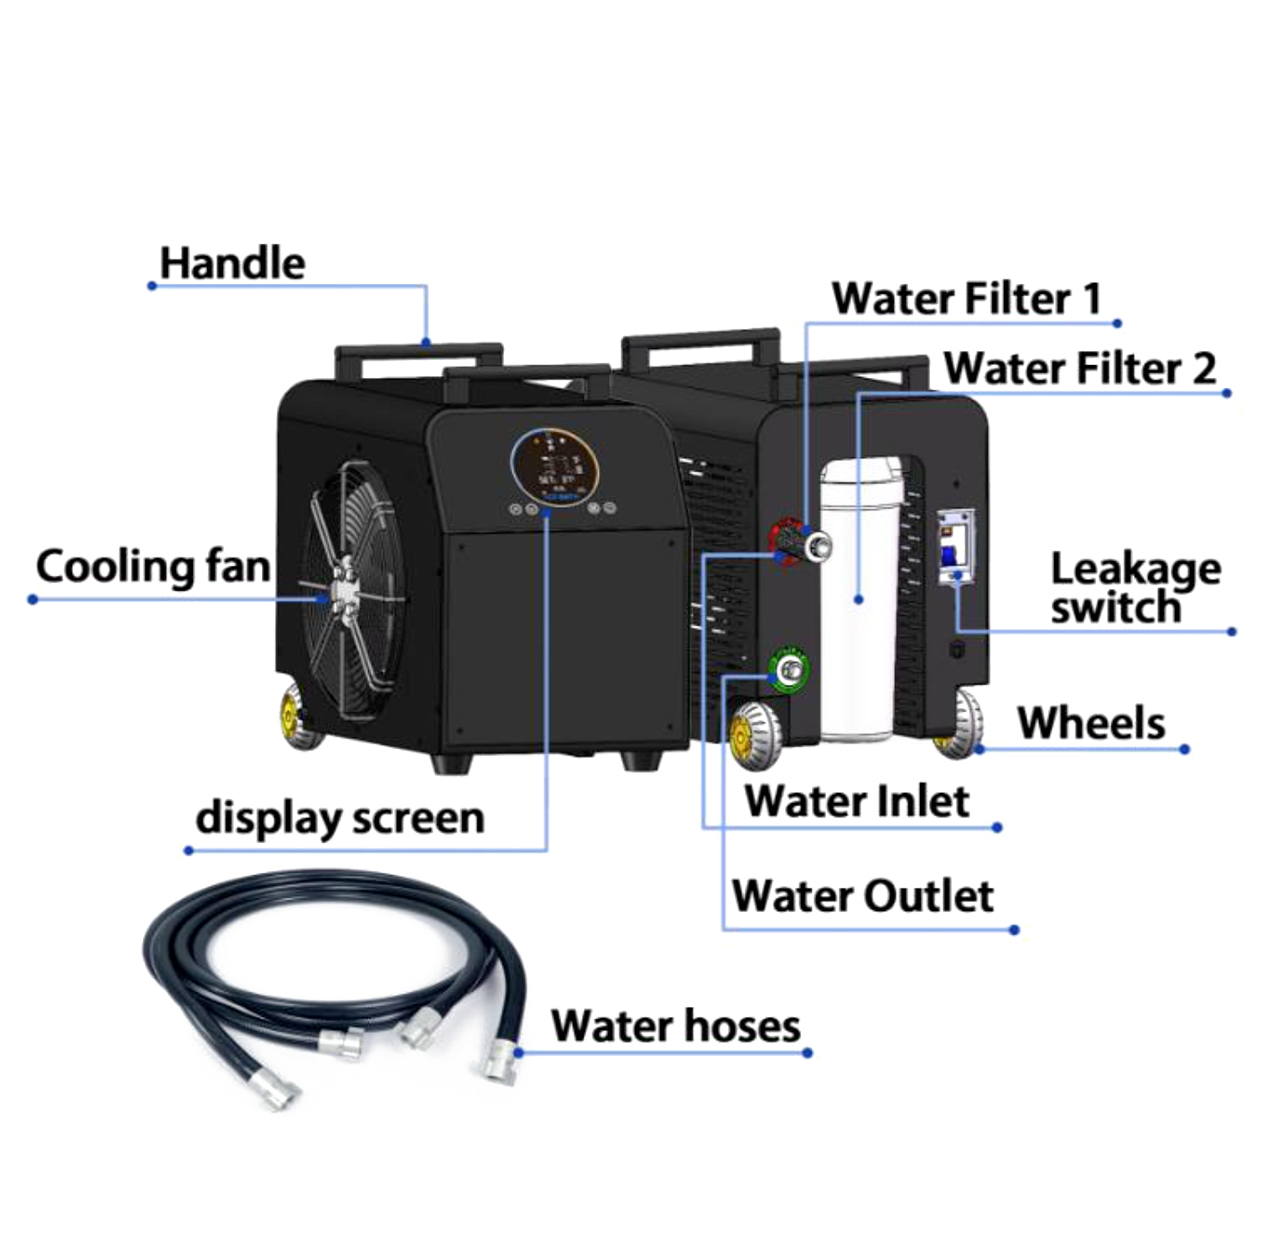
Appliance Description
Carry Handles: For easy transportation.
LED Screen: Displays operational status and settings.
Water Hoses: Connect to the tub for water circulation.
Water Outlet: Where cooled water exits the chiller.
Water Inlet: Where water enters the chiller.
Water Filter 1 & 2: Filters impurities from the water.
Leakage Switch: For safety against electrical leakage.
Cooling Fan: Helps in maintaining the chiller’s temperature.
Wheels: For easy mobility.
x1 Installation Part 1
Maintenance Instructions for X1 Chiller
Cleaning Sundries (2):
Regularly clean up any debris or sundries on the chiller to ensure optimal
performance.
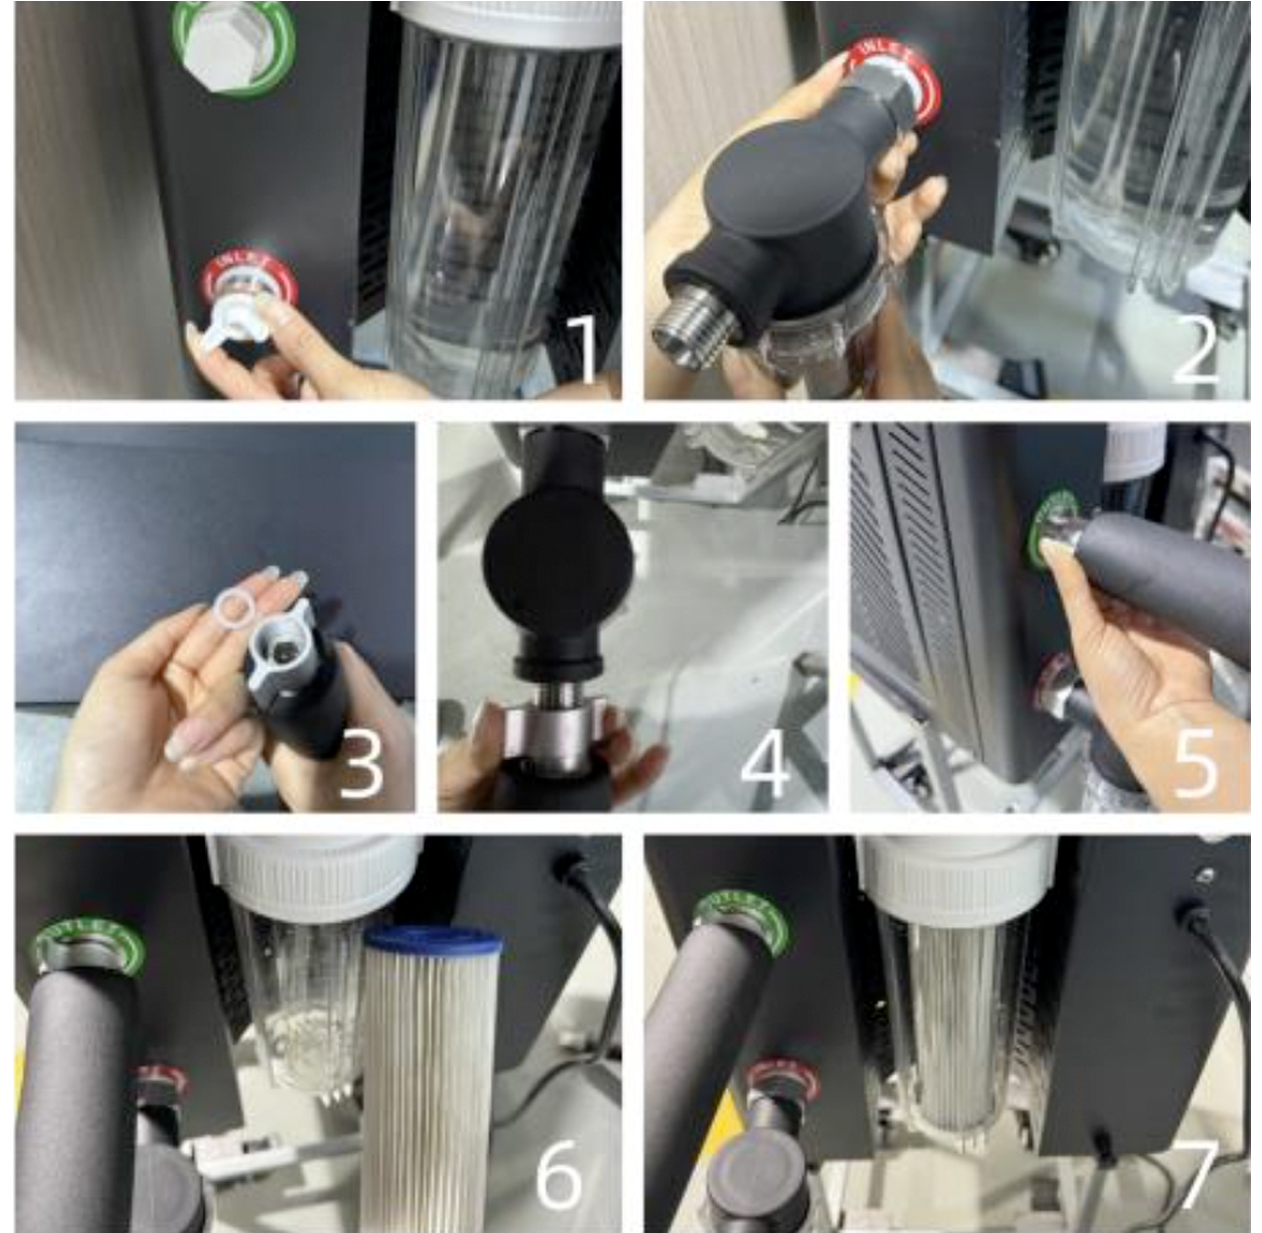
Replacing the Paper Filter Element:
Replace the paper filter element when it becomes clogged or dirty to maintain proper water flow.
It is necessary to clean the filter when the water flow drops below 12 liters per minute, as indicated on the screen.
x1 Installation Part 2
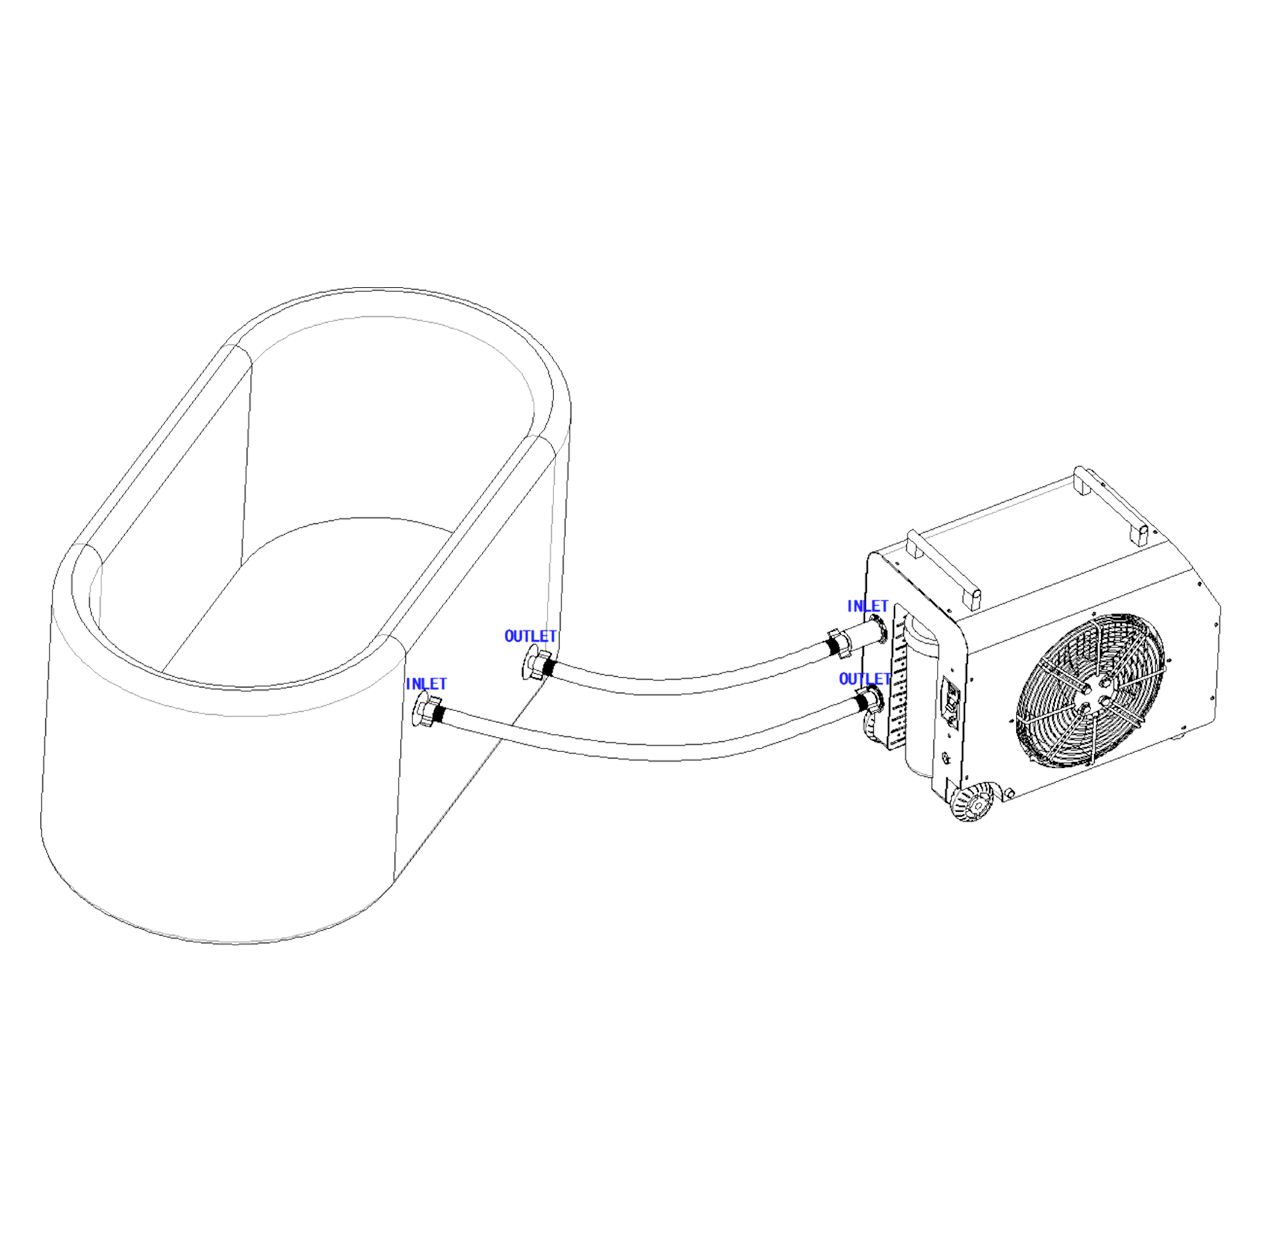
Connect Water Inlet and Outlet:
Connect the chiller INLET to the tub OUTLET, ensuring the connection parts have a sealing gasket (Torque 4KG).
Connect the chiller OUTLET to the tub INLET, ensuring the connection parts have a sealing gasket (Torque 4KG).
Fill the Tub:
Add enough water to the tub and wait a few hours for the water to cool to the desired temperature.
Enjoy Your Ice Bath:
Turn off the chiller and enjoy a safe bath once the water reaches the desired temperature.
Control Panel Description
Adjusting Target Temperature:
- Click the 'SET' button until the display starts flashing.
- Use the 'UP' or 'DOWN' button to set the desired target temperature.
Connecting to WiFi via Bluetooth: - Ensure your phone’s Bluetooth is switched on.
- Connect to a 2.4GHz WiFi network (the chiller does not support 5GHz networks).
- Press and hold the 'SET' button on the chiller for 6 seconds until you hear a beep. The WiFi icon on the chiller should start flashing.
- Open the TUYA app on your device and follow the prompts to connect with the chiller.
Child Lock - Activating/Deactivating Child Lock:
- Press and hold both the 'UP' and 'DOWN' buttons together for 5 seconds to lock or unlock the control panel.
Changing Modes - Switching Between Modes:
- Press and hold the 'UP' button for 15 seconds to toggle between 'cold only' and 'dual temperature' modes, if the chiller is designed to support both modes.
Changing Temperature Units: - Switching Between °C and °F:
- Press and hold the 'DOWN' button for 10 seconds to switch the temperature display units between Celsius (°C) and Fahrenheit (°F).
Operating Conditions
Cooling Mode: Ambient temperature range of -5°C to 40°C.
Heating Mode: Ambient temperature range of -10°C to 40°C.
Storage: Store at a temperature range of 1°C to 50°C with relative humidity between 20% and 85%.
Important Reminders
Disconnect inlet and outlet hoses and run the chiller without water until "FL" is shown on the screen when not in use to prevent scale deposits and freezing damage.
APP Connection
- Switch on Bluetooth on your device.
- Download/open the Tuya app on your iOS device.
- Press and hold the set button on the chiller for 6 seconds until you hear a beep. The WiFi symbol will now show on your chiller.
- Click "Add" when the device pop-up appears on your Tuya Smart app.
- Enter your WiFi ID and password (2.4GHz network only), then click “Next”.
- Wait for the setup to complete to control the chiller remotely.
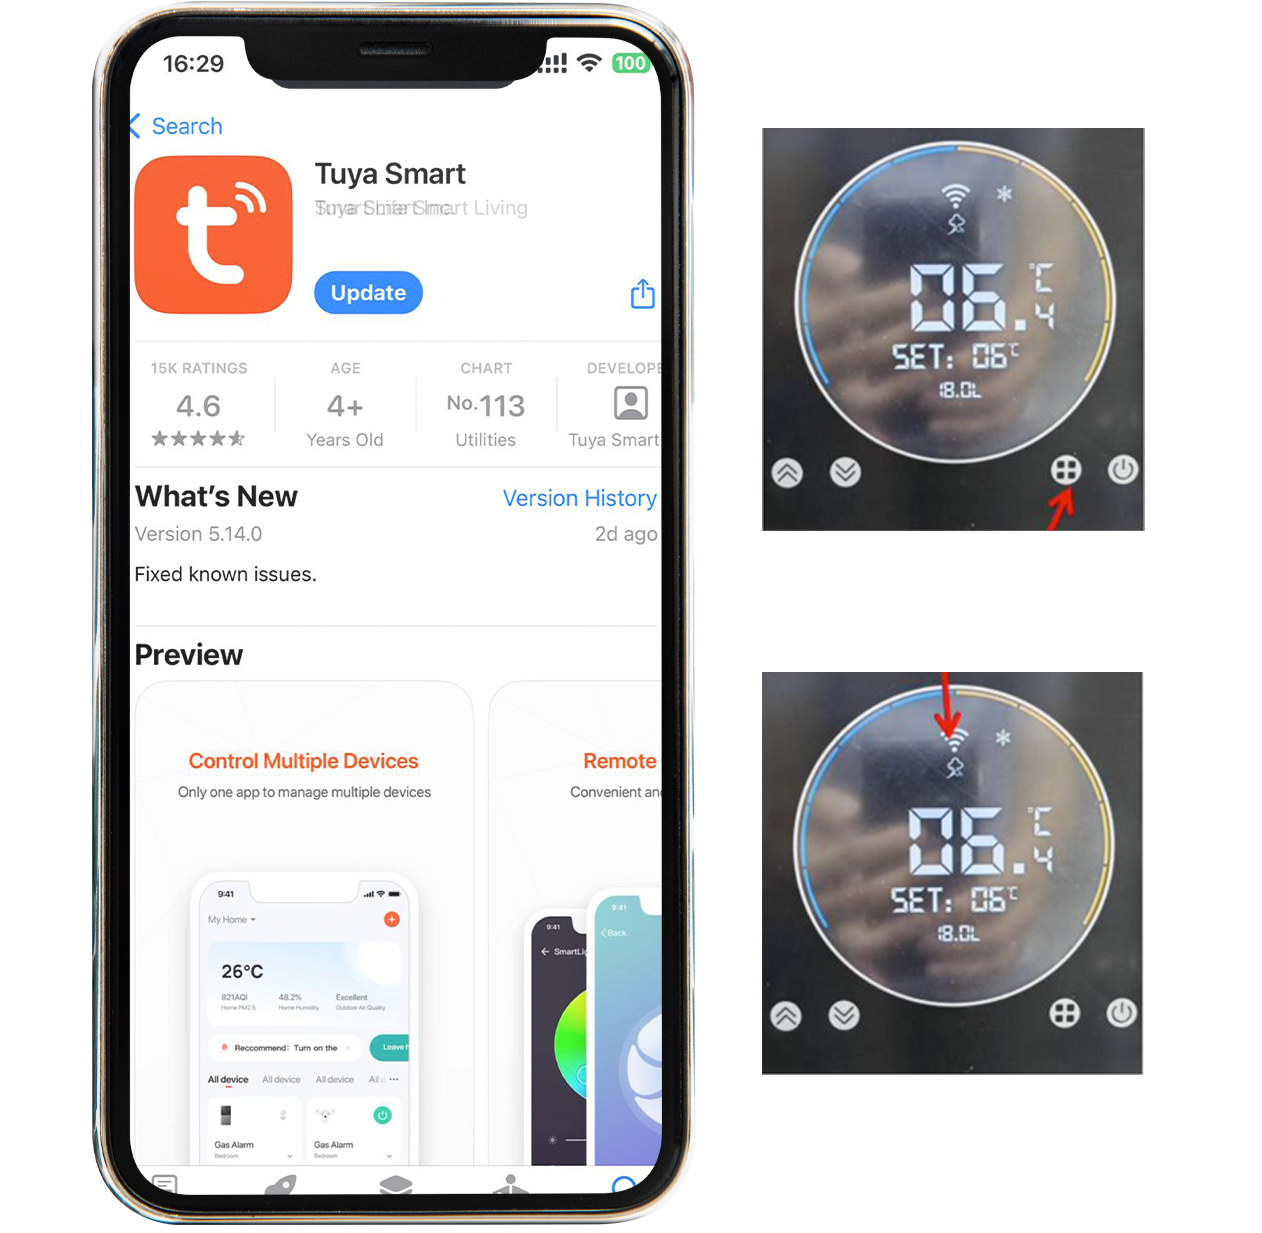
APP Connection
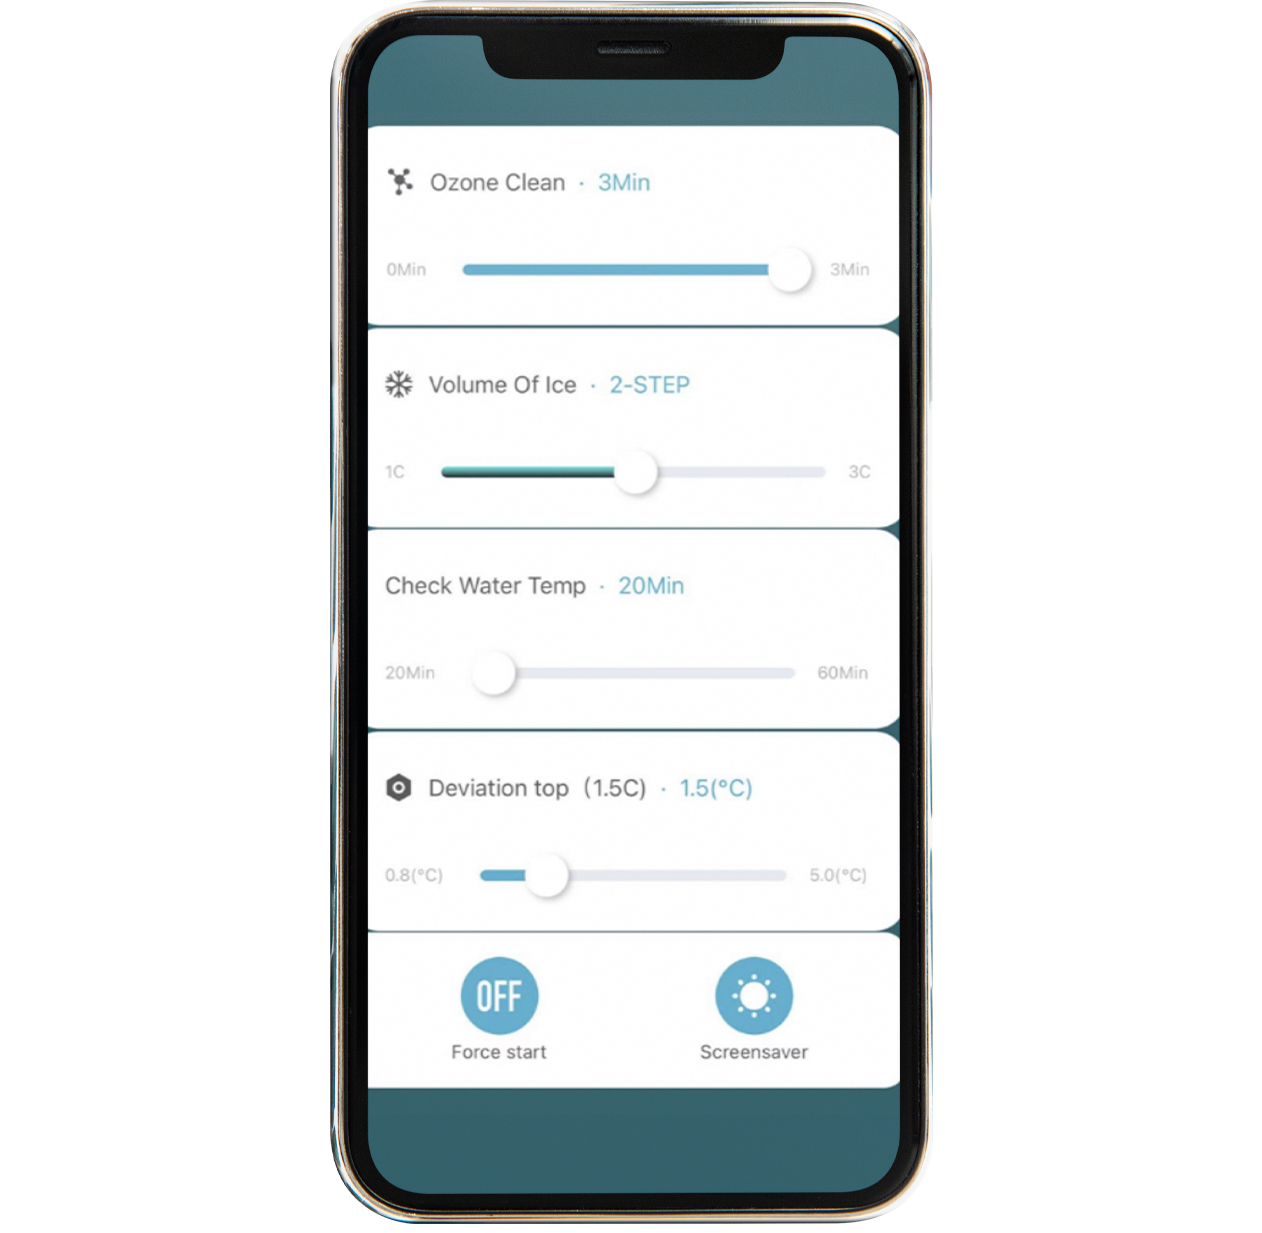
Ozone Clean:
- Default setting: 400mg of ozone per hour with automatic emission every 30 minutes.
- Adjust emission time from 1 to 3 minutes as needed via the app.
Volume of Ice: - Level 1: Small amount of ice at -0.4°C.
- Level 2: Medium amount of ice at -0.7°C.
- Level 3: Large amount of ice at -0.9°C.
Water Temperature Check: - Default: Checks every 20 minutes and restarts at 4°C.
- Adjustable check frequency from 5 to 30 minutes via the app.
Deviation Top: - Set deviation top to manage compressor startup and prevent electricity waste in high ambient temperatures.
Screensaver and Force Start: - Screensaver default is "off" mode, screen shuts off after 5 seconds of inactivity.
- Use the "Force start" button if the chiller shows an FL error code but the water flow is normal.
